Cheap Outline Highlight Shader
Most games use some sort of highlight effect to denote objects of interest. It could highlight weapons that players can pick up, or even highlight other enemies through walls.
This effect usually isn't cheap; the most common method people use is a post process shader effect that samples the stencil buffer texture many times, each with a uv offset, and then averages them together to create an outline. I wanted to explore ways that we can make this effect more efficient, and came up with 2 improvements.
Method 1: Stencil Subtraction
One easy (but limited) approach for a cheaper outline is to simply subtract a distorted stencil texture from an unmodified stencil texture. In the example below, I have a post process shader that does just that; it finds the object that matches stencil ID 50, and subtracts the two stencils. The distorted stencil simply has a noise texture that is being panned and added to the uv coordinates.
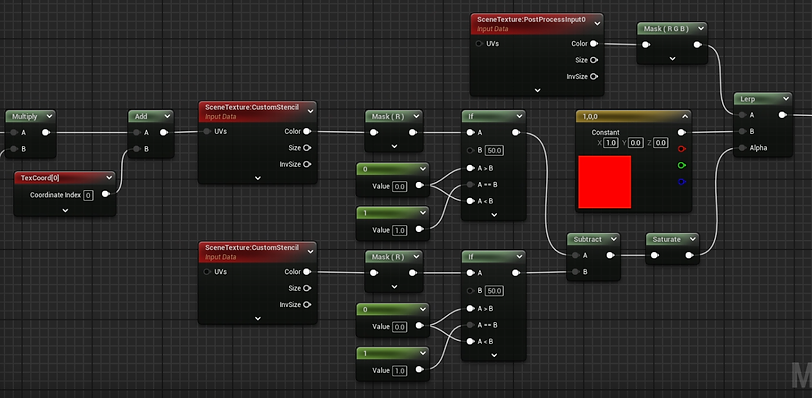

And here is the result of that:
It's obviously not the fanciest effect, and you probably wouldn't see this in a AAA game. But for a stylized game, or a game targeting older hardware, this could be a great solution to help optimize performance.
Method 2: Billboards
Let's say you want a better looking outline effect: a nice soft glow that we can create by using a for-loop in some HLSL code. Normally this type of thing is expensive in the post process shader because it's going to be run in the background all the time on every pixel, even if no object on screen is using the outline. We can minimize this cost overhead by repurposing the post process shader to be a translucent shader that we attach to a billboard.
First, create a blueprint and add the object you want, as well as a billboard that fits around the entire object.

You'll want to turn on stenciling on the object that needs the outline. Next, create an unlit translucent material and change two material properties on it:
-
Disable Depth Test
-
Allow Custom Depth Writes
Next you'll want to use your Custom node to run the stencil sampling. I've listed some example HLSL code below that works with multiple stencils each using different highlights. Note that this is not the most optimized HLSL code, it's just an example of what you could use.
static const MaterialFloat PI2 = 3.14159265359f * 2;
const int CDIndex = 13;
const int CSIndex = 25;
Steps = clamp(floor(Steps), 1, 128);
RadialSteps = clamp(floor(RadialSteps), 1, 128);
MaterialFloat stepSize = Radius / Steps;
MaterialFloat radialStepSize = PI2 / RadialSteps;
MaterialFloat result = 0.0f;
MaterialFloat stencil = 0.0f;
for (int i = 1; i <= Steps; ++i)
{
MaterialFloat currStep = i * stepSize;
for (int j = 0; j < RadialSteps; ++j)
{
const MaterialFloat angle = j * radialStepSize;
const MaterialFloat2 coord = MaterialFloat2(cos(angle), sin(angle)) * currStep + UV;
MaterialFloat2 SampleUV = ClampSceneTextureUV(ViewportUVToSceneTextureUV(coord, CDIndex), CDIndex);
const MaterialFloat SampleValue = SceneTextureLookup(SampleUV, CDIndex, false).r;
result += (MaxDistance - clamp(SampleValue, 0, MaxDistance)) / MaxDistance;
const MaterialFloat2 StencilUV = ClampSceneTextureUV(ViewportUVToSceneTextureUV(coord, CSIndex), CSIndex);
stencil = max(stencil, SceneTextureLookup(StencilUV, CSIndex, false).r);
}
}
result = result / (RadialSteps * Steps);
return MaterialFloat2(result, stencil);
Putting it together in the shader, I have this node setup:

And we can see the final result below!

By moving the outline effect to a billboard, we are only paying for the pixels on screen that use the billboard. And when we don't need to highlight something, we can just turn off the billboard so there's no cost running in the background!