Character-Only Decals


Decals are a great tool for bringing environments to life, but Unreal is limited in how we can customize decal rendering on a per-mesh basis. There isn't an easy way for a mesh to accept some decals and exclude others; we're only given a single checkbox that tells the mesh to accept all decals or nothing.
This becomes problematic for characters because they run through environments filled with puddles, cracks, painted signs, and other unique details that have been placed via decal. In order to prevent all those decals swimming across characters that overlap with them, many studios just turn off decals entirely on all of the character meshes.
But what if you still want decals on characters? For example, you may want to spawn blood splatter decals onto characters in local space whenever they take damage. There are plenty of use cases for having decals on characters, and so I wanted to create a solution for distinguishing between "character" decals and "environment" decals. We can achieve this goal using DBuffer Decals.
DBuffer Decals
DBuffer Decals are a relatively new thing to Unreal. They allow materials to sample the decal buffers manually to apply custom blending, rather than letting the old school decal actors handle the rendering automatically. By setting up dbuffer decals, we can store custom data in the decal attributes and retrieve that data on the receiving material.
To use dbuffer decals, you first need to turn them on in the Project Settings.

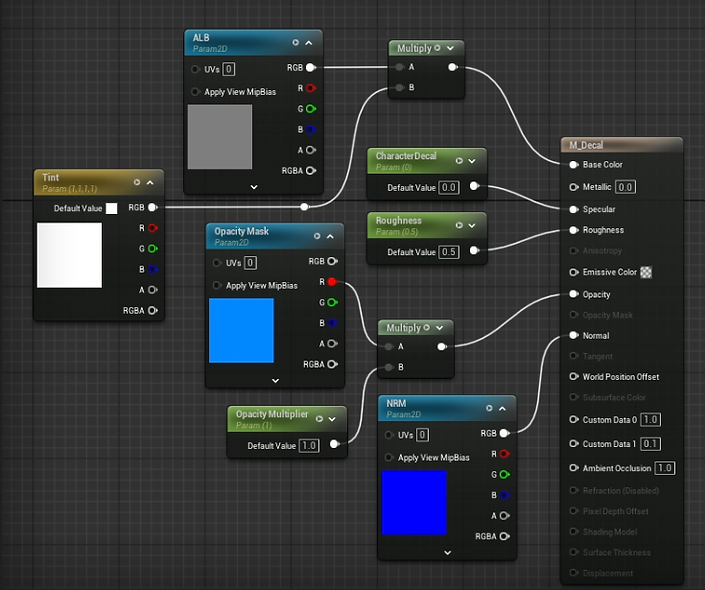
Next we can create our decal material like normal using the Deferred Decal material domain. The only thing that we want to do differently is to create a new scalar parameter called CharacterDecal and link it to one of the decal output pins. The parameter will act as our mask that will separate environment decals (CharacterDecal=0) from character decals (CharacterDecal=1). Since the Specular pin isn't often used in materials, we can sacrifice it in the decal to store our new data, and just assume that all decals will have 0.5 specular. Other uncommon pins that you can store the data in are Metallic, Custom Pin 0, and Custom Pin 1.
The third step is to change the Decal Response in the receiving materials (our environment material and character material). Change the setting from Color Normal Roughness to None. This will temporarily cause your decal to disappear on these meshes.

The final step is to set up the manual decal blending in our receiving materials (environment material and character material). We can retrieve the decal information from 3 built-in decal nodes called DBufferA, DBufferB, and DBufferC, and use a lerp to blend them with the original material information. The B channel of the DBufferC node stores the specular data, which is where I put our CharacterDecal mask, so I use that along with another set of lerps to toggle the decal on/off based on its target mesh.
Note that the environment material and character material will handle the CharacterDecal parameter differently:
-
In the character material, when CharacterDecal=1 we will display the decal information.
-
In the environment material, when CharacterDecal=0 we will display the decal information.

And that's it! In relevant character MIs, you can set our new parameter to 1 and watch as the decals are filtered correctly!
No decal separation
Decals separated by environment and character